Tuesday, 27 April 2021

ANZAC day and Poppy Moments dies


On April 25th Australia and New Zealand celebrated ANZAC day, a day we remember the sacrifice of the men and women who have served our countries in various wars across the past 150 years. In memory of the Men who have served in my family and of a dear friend who I adopted as a Grandfather, I made a wreath this year using the Poppy Moments and Painted Labels Dies, the Thankyou sentiment comes from the Heal your Heart Stamp-set which was free in the last Sale-A-Bration. On the back I wrote the names, lifespan and regiments these men served in. I felt it was a beautiful tribute to these men.

While there was no march again this year due to ongoing COVID regulations, we did still take the wreath up and place it at the cenotaph at our local RSL club. It looked lovely sitting there and when I went past on Monday it was bookended by other wreaths as well. 


I also made some badges for my family to wear - these use the same dies and I have added a broch pin to the back.

I love that theses dies are so versatile. For the card below I've used the stamps from the Painted Poppies stamp set to create my own background paper, then added the die cut poppies over the top. The sentiment comes from the Peaceful moments stamp set. I love how the card sits up in 3D fashion, but folds flat to go into an envelope. You can currently purchase the Peaceful Moments stamp set and the Poppy Moments Dies as a Bundle for $90.75Au and the Painted Poppies stamp set and the Pained Labels dies as a bundle for $90.75Au. Each bundle saves you 10% on the price you would pay purchasing them separately. This Bundle deal ends on the 3rd May however so head over to my online store if you wish to purchase them. You will still be able to buy them after the 3rd but without the 10% bundle discount.


Another way I've used theses dies is on a scrapbook page. This page pays homage to my great great grandfather who served in both the first and second world wars. While the background paper is not from Stampin' Up (I believe in using what you have and not wasting papers) the look could be achieved using the Very Versailles stamp set which is only $40.00Au on my online store.

I hope you've enjoyed looking at some of the ways I've used the Poppy Moment and Peaceful Poppies Bundles, and that I've encouraged you to perhaps give them a try yourself.

If you wish to purchase either or both of these bundles, you can follow this link which will take you to my online store and you can simply add them straight into your basket. https://krishathomas.stampinup.net/my_projects 

Until next time, Happy Crafting.


Monday, 12 April 2021

Flowering Cactus Side Step card

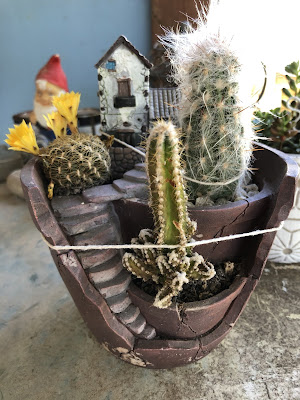
 This week I have yang around with the Flowering Cactus Product Medley, found on page 8 of the January-June 2021 mini catalogue. I love succulents and cactus’ they are some of the few plants I can actually grow without killing!Here are some pictures of some of my cactus’ and zygote cactus in bloom. The Zygote cactus came from a cutting from my Grandmas plant and this was the first time it had ever bloomed. You can see some of my strings of pearls and stings of beans in the background. 


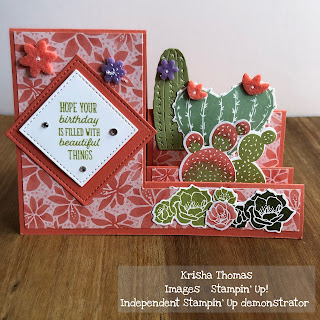
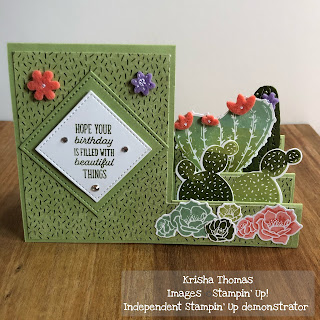
So the cards I’ve been making using the Flowering Cactus Product Medley are side step cards. I’ve made a template which you can copy (photos below). I find by physically drawing a template means that I can keep it and have ease of access when I want to make this style of card in the future. The first photo is of the card template. The second photo is of the back where I have drawn the measurements for matting the card. I’ve added the measurements in both Inches and Centimetres, although myself I only use the inch measurements. 


And this is the end product of the cards 


Hope you enjoy making them as much as I did. 
Until next time,
Happy crafting. 

Saturday, 3 April 2021

Happy Easter


Today I thought id share with you all a very quick and very easy basket which is perfect for Easter, but could be used for Mothers Day or just because.


To make this basket you need:

  • a 6x6 piece of paper
  • a 6x1 piece of paper
  • 2 brads or split pins
Yep, thats right - No glue, no tape - just 2 brads.

Optional:
  • Double oval punch
  • Oval occasions stamp set
  • Matching ink pad


Above, you'll see the template for this basket.
It's a 6x6 inch piece of paper. I've used the Flowers for Every Season Designer Series Paper.
Score at 2 and 4 inches.
Turn 90 Degrees then score at 2 and 4 inches again.
You then need to make cuts (either using scissors or your trimmer) From the left edge to the 2" mark, then from the right to the 4" mark.
Repeat at both the 2" and 4" marks. (See photos)


Next you will need to fold the side flaps to create the sides of the basket. As pictured below, the two outer fold into the middle with a slight overlap. The two corners meeting in the middle at an angle. The middle flap is tucked away on the inside. 

Next, you are going to slide the 6x1 piece of paper between the outer flaps and the inner flap - this will help hide the end of the handle and help secure . Using a piercing tool, to create a hole in the flaps and handle - secure with a brad. Repeat the above steps with the other side.


If you wish to add a sentiment, you can secure it to the side using tape or dimensionals for added depth. 

Finally, fill your basket with shredded paper and add some Easter eggs and/or lollies. 


So there you have it - a super easy basket that takes only minutes to make, looks fabulous and will be sure to delight the recipient. 

Have a wonderful Easter, Until next time
Happy Crafting.