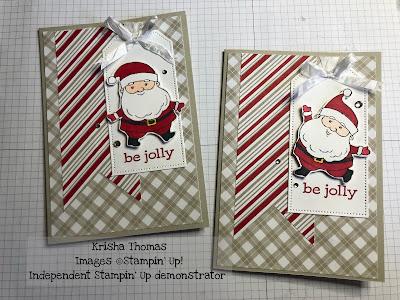
Be Jolly Christmas Cards
Here is a quick and
easy recipe for a simple Christmas card using the Be Jolly Stampset and the
Tailor Made Tags Dies.
Ingredients:
Be Jolly Stamp set
Tailor Made Tags Dies
Sahara Sand Cardstock
– 8 ¼ by 5 ¾ (half an A4 page) scored at 4 1/8 (half of the page)
Base DSP – Peaceful Prints
– 4 7/8 X 5 5/8
DSP banner – 2 x 5 (I
used my cutter to cut 1” up the middle then cut from the edges to the top of
the cut to create the banner shape)
White Cardstock – one
piece 2 ½ by 4 ½ - about the size of the larges Tag Die.
White Cardstock – one
piece 2 ½ by 4 ¼ - about the size of the
Santa stamps.
White crinkled seam
binding ribbon – one piece about 8” and one about 1 ½”
Basic rhinestone gems
Glue or adhesive of
your choice – I prefer glue but everyone has their favorite type of Adhesive.
Colouring tools of
your choice – I’ve used the Stampin’ Blends in Real Red, Basic Black, Daffodil
Delight and Petal Pink
Real red Stamp’n Pad.
Method:
1. Cut the cardstock and DSP to the above measurements.
2. Using one of the white pieces of cardstock, cut out the tag, using the largest of the Tailor Made Tags Dies. Stamp sentiment on the bottom of the tag in Real Red Ink.
3. Stamp and colour the Santa image of your choice onto the second piece of white cardstock. I’ve used the Stampin’ Blends in Real Red, Basic Black, Daffodil Delight and Petal Pink. Fussy cut around the Santa and stick onto the die cut tag. I’ve use the Stampin’ Dimensionals to give Santa a slightly 3D effect. Thread the 1 ½’ piece of ribbon through the hole and set tag aside.
4. Adhere the DSP Banner onto the DSP base – leave about ¼” from the left side, while sitting flush with the top of the DSP.
5. Adhere the Tag over the Banner – I’ve placed the tag about ¼” from the right side of the base DSP.
6. You will have the ribbon from the tag hanging over the top of the base DSP – you will need to turn the DSP over and fold the ribbon so that you can secure it to the back of the DSP. Ive used Tear and Tape.
7. Apply Adhesive to the back of the DSP and stick onto the Sahara Sand Cardstock.
8. Using the 8” ribbon, tie a bow – then stick to the top of the tag, above Santa’s head
9. Add some rhinestones and your card is complete.
I hope you enjoy making this card as much as I have.
Until Next time,
Happy Crafting.


