Sunday, 30 July 2023

Frames of Encouragement using the Paper Florist Dies and Courage and Faith stamp set

Continuing with projects created with the Paper Florist dies, today's projects are two frames with a bible verse in the center from the Courage and Faith Stamp Set. 

Here's a quick glance at the two frames together. The frames are cheep frames from K Mart, I think that cost me about $2 each. I've moved the glass to go under a 6 x 4 inch piece of card stock so that I could glue some of the flowers directly onto it. I've stamped the bible verse into the middle of the card, secured it inside of the frame, then placed the flowers around the edge of the frame. When I was happy with the placement, I adhered them to the frame and card with a hot glue gun. I used a hot glue gun because I wanted the flowers to last a while and although the think that Tombow would do the trick, I also want to be able to transport the frames with minimal damage! 

For the first frame I used pinks and purples using Berry Burst, Melon Mambo, Highland Heather, Fresh Freesia, and Basic White card stock for the flowers and Parakeet Party and Green Granny Apple card for the leaves.


While the second frame uses oranges and yellows with Pumpkin Pie, Melon Mambo, Daffodil Delight and Basic White card for the flowers with Garden Green and Green Granny Apple for the foliage.


I love the Courage and Faith stamp set which features a number of bible verses with encourage and uplift which I think are a perfect pairing for the Paper Florist dies.

If you have been inspired to create your own home Decor featuring the Paper Florist Dies, please send me a photo or tag me on your socials - I would live to see your take on them.

I have one more project to share with you using the Paper Florist dies then I might also create some cards with them as well.

If you would like to purchase the Paper Florist dies or any of the other supplies I've used for this project and you live in Australia and you don't already have a Stampin' Up! demonstrator, please head over to my online store https://krishathomas.stampinup.net/

Until next time.

Happy Crafting


Friday, 28 July 2023

Create your own home decor using the Paper Florist dies


As I promised in my last post, today I am sharing one of the projects I created using the Paper Florist dies from Stampin' Up! Here is my first project.

This project uses a Mirror I purchased from the Reject shop (that's a bargain store here in Australia) for about $4, which I then painted with white paint and used my hot glue gun to adhere the flowers and greenery created using the Paper Florist dies.
As you can see, I've added stamens to all of these flowers and added a wink of Stella for a bit of bling as well.
How awesome is it that our lounge room wall, matches the bottom flower created using one of the new colours - Berry Burst.


Here's another shot of the same mirror on a plainer background which makes the colour of the flowers pop more.


This final photo shows the Wink of Stella that I have used on the stamens of the flowers.

If you would like to purchase the Paper Florist Dies, live in Australia and don't already have a Stampin' Up! demonstrator, head over to my online store https://krishathomas.stampinup.net/ or send me an email and I can help you to purchase them.

I have a couple more fabulous projects to show you in my next blog.

Until next time,

Happy Crafting.


Thursday, 27 July 2023

Colour Challenge

Last night, I joined our monthly team meeting with my team leader and other members of our Stampin' Up! team, where we were given a 20 minute colour challenge.
We needed to create a simple card using 4 colours that were given to us in the meeting. 
This weeks colours were Cherry Cobbler, Crushed Curry, Wild Wheat and Sweet Sorbet. 


Now these are not colours that I am naturally drawn to so I initially struggled to think of what I could create with them. 
However, as the Adrenalin settled, I  realized that these are very autumnal colours and this made me think of the Cottage Wreath stamps and the Country Wreath dies.


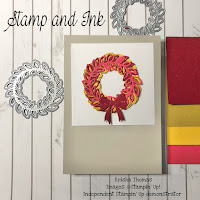
To make my card, I die cut two of the wreaths in each colour, then layered two of the larger die cuts and two of the smaller die cuts together to create the wreath and adhered them onto a 3" square of basic white card. This was placed onto a Crumb Cake card base. I also die cut a bow in Cherry Cobbler, which was glued to the bottom of the wreath to finish it off. I chose to leave the card blank so that I could add a sentiment when I wanted to use the card. 


When I finished my card, I still had 5 minutes of the challenge left and I had left over wreaths, I chose to make a decoration as well.
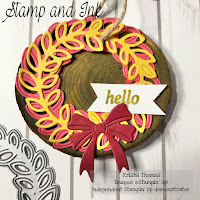
I used the Wild Wheat ink pad to colour a wood biscuit and glued one of each size wreath onto the biscuit, added a Hello sentiment from the Cottage Wreath stamp set and another die cut bow to finish the item.

While not a colour combination I would have chosen to use, I was happy with the products I was able to create in such a short period of time.


I think the furry one has chosen her favourite as well (she is sitting on the card!)

If you live in Australia and don't already have a Stampin' Up Demonstrator, you can purchase the Cottage Wreath stamp set and the Country Wreath dies through my online store here


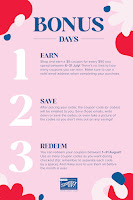
Don't forget that until the end of this month, you get a $9 voucher for each $90 you spend which you can use in my online store next month. Feel free to send me a message if you would like more information about this promotion. 


Until next time,

Happy Crafting.


Wednesday, 26 July 2023

How to make paper flowers using the Paper Florist dies from Stampin' Up!

Last week I posted a blog featuring two cards I created using the Paper Florist dies from Stampin' Up!

I have discovered that making the paper flowers is quiet addictive and I spent 2 full days cutting and creating different styles of flowers to use in some 3-D crafts.
I thought that I would show you all some of the flowers that I created alongside the pieces I used to create each flower. I've added some instructions under the photos in case you would like some more detailed instructions.

1.           2.

For the first flower (photo 1), I cut the large petal die twice to create 6 petals. I then also cut the round stamen and the long stamen. I curled the petals buy running them along my bone folder tool, then I placed a small dot of Tombow glue onto one of the flaps at the bottom of the petal, folder the other side over the top and secured with a small peg until they had dried. Next, I wrapped the long purple stamen around the pointed part of the take a pick tool and secured it with a little Tombow, then left it to dry for a few minutes while I assembled the flower. After the petals had dried, I began assembling the flower by adding Tombow to 1/2 of the base of the petal, and placed another petal on top but at a slight angle so that I could get three petals evenly spaced to form the inner later of the flower. Then I glued the remaining petals between the gaps in the first layer, to create the outer layer of the flowers. 
I glued in the yellow stamen, then I used a glue dot to secure the purple stamen in the middle.

For the second flower (photo 2), I cut 2 of the large petal dies and one of the die with 4 flowers. I assembled the 6 large petals in the same way I did the first flower. However to make this flower fuller, I used the bone folder to slightly curl the smaller 4 petal flowers, then used the Tombow to glue them together at a 90 degree angle so that there were no gaps. I started with the larger two petals first, then added the two smaller pieced on top. This additional flower was then added to the centre of the first flower. I rolled the stamen around the pointed tool on the take-you-pick tool and secured it onto the flower with a glue dot.

3.           4.

These two flowers used the die with two flowers on it. I've cut the die twice.
In the flower in photo number 3, I've used Tombow to secure the flower pieces on top of each other. You might want to have a little play around with final placement, because they don't quite fit perfectly and you will end up with gaps between the petals like I have here. Then I placed the smaller petals in the same way and added the round dot to the center. For this one, while the glue was still wet, I used my piecing mat and the embossing tool on the take-you-pick tool, running it around the yellow dot to create a slight lift in the petals.

The flower in photo number 4 was created by using the bone folder to curl the petals first, before assembling them. This created a more 3D effect. While I haven't placed a stamen in the center of this flower, you could easily do so. 

5.          6.
The flower in photo number 5 was created using the long die that looks like it's X's and +'s. Again I've curled the edges with the bone folder, then glued the two larger pieces together with Tombow. I placed them at a 90 degree angle so that each of the gaps were filled. When placing the smaller flower pieced, I again offset the pieces at about 90 degrees to fit between the gaps in the larger flower. I then placed the flower on the piercing mat then used the embossing tool to draw small circles until the center of the flower dipped and the outer edges lifted off the mat.

To create the flower in photo number 6, I've combined the flowers made in photo 5 and 4. This creates a fuller flower,

7.          8.
The flowers created in photos 7 and 8 both use the 4 flower die cut once. However, The difference with these two flower lie in the way I have curled the smaller flowers.
In photo 7, I have curled the petals down, before constructing the flower.
However, In photo 8, I've left the larger flower pieced uncurled, and curled the smaller pieces up so they curl away from the base of the flower. While I have not placed a stamen in any of these, You could easily use any of the stamen pieced in the middle of your flowers.

9.          10.

The final flower I want to show you today uses the long X and + die as well as the two larger flowers from the 4 flower die. I've created the center of the flower in the same way I create the flower in photo 5. I glued together the two larger flowers, at a 90 degree angle, then glued the first flower into the middle, creating a smaller but still full flower, as you can see by the finished flower in photo 10.

As I started creating the flowers, I played around with different ways of curling the petals, gluing the petals in different combinations and also creating different middles for the flowers - which I have not shown you here. It was rather addictive!!

Over the next couple of blogs, I'll show you some of the project's I created using these and the container full of other flowers I created. 

If you live in Australia and don't have a Stampin' Up! demonstrator, but would love to purchase the Paper Florist Dies, you can find them on my online store https://krishathomas.stampinup.net/ or if you would like to chat with me about anything Stampin' Up! send me an email and I will get back to you ASAP. 


Don't forget that until the end of the month, For every $90 you spend, you will receive a $9 voucher to use in August with the Bonus Day's promotion

Until next time,

Happy Crafting.


Monday, 10 July 2023

Paper Florist Dies

It’s been some time since I last blogged my card creations but I hope to get back into blogging on a more regular basis. 

These two cards were created for the latest Global Design project challenge (number 401) which was a colour challenge to use Parakeet Party, Bubble Bath and Lemon Lolly. These are not colours I would normally choose to use, so it was good to try something out of my colour comfort zone  

The cards I created used the Paper Florist Dies, a gorgeous die set hidden away in the 2023-2024 Annual catalogue (you can find them on p 33).

After die cutting the flowers in Bubble Bath and Lemon Lolly and the leaves in Parakeet Party, I added depth of colour to the flowers and leaves by using the blending brushes to apply tone on tone ink achieving a slightly darker tone and greater depth of colour. 

For the first card, I’ve also used the stripe embossing folder from the stripes and splatters embossing folders set for extra texture. I used the blending brushes to add a hint of Parakeet Party around the edges before adhering it to the card base. 

The second card uses a Paraket Party base with the flowers arranged on top. 

While the dies do not come with instructions on how to make the flowers, it was pleasant to take the time to experiment creating different flowers with the dies. 

If you like these cards and would like to make them yourself, you can purchase all of the items I’ve used to create this card from my online store or contact me if you live in the southern highlands NSW and would like to learn how to make cards like these yourself.