Tuesday, 30 March 2021

Technique Tuesday


One of the things I love about stamping and making cards is that you can craft as simply or as complex as you like. I’m someone who likes a pretty basic card with clean lines and to let the images do the talking for me. But every now and then I like to step out of my comfort zone and try something different, to experiment with a new technique or one I haven’t tried for a while. 

Today I decided to revisit the technique of masking. 

Masking is a technique where you stamp an image, cover it up and stamp over it to create a depth of texture or images- sounds a little complex but it’s not. 

I start by stamping an image onto a post-it note. Today I used the retried “Beautiful You” stampset from Stampin’ Up! I love the simple elegance of these stamps and for this reason it’s one of my favourite stamp sets. A little tip is to stamp as much of your image as you can over the sticky part of the note- this will help it stay where you need it to later. 


Next I cut around the image- cutting as close to the image as possible. This creates the mask for your project  

After stamping the same image onto a card front (or where ever you wish it to be), I cover the new image with the post-it note mask. You can see why stamping over the sticky part of the post-it note was important, as the image will now stay where you have placed it. 


Then using either another stamp or Stampin’ Up’s new blending brushes you can apply colour and textures over and around your mask confident that your image underneath will remain clean until you remove it. I did need to hold the leg parts of this image down while blending,  because it was larger than the sticky part of the post-it. But as I have learnt, practice makes perfect and it may take some time until you are completely happy with your efforts. 

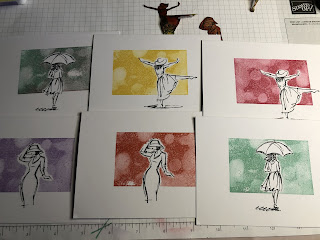
When using stamps over the mask you may find it leaves a large negative space between the colour and the image you stamped. I’m not sure how to eliminate this- I’ve tried cutting the masked image closer to the lines, I’ve tried placing the card on the stamp and rubbing it to try to get the ink closer to the mask but nothing I try seems to work. Overall though I am happy with the effect and it’s possibly just me and my fussy-ness that even notices! The stamp I’ve used in this image is from the retired “Bokeh Dotes” stamp set. 

The colour in this image has been applied using the blending brushes and you will notice that the negative space from the previous image is not evident in this image- that’s because the blending brushes are able to get closer due to the thousands of bristles on the brush- I’m much happier with this outcome. You will also notice that on this image, in addition to the background colour, I’ve also stamped a flower pattern using the “Queen Anne’s Lace” stampset. I love the additional depth this gives. 

Here are the finished cards I’ve made using the masking technique. I love the simple elegance of them and have chosen not to add a saying to them in order to make the cards more versatile.  


Sunday, 28 March 2021

First Ever Post (and I’m nervously excited...)


 So... today I have taken the plunge and signed up for my own blog. I’m kind of nervous- I like to succeed in all that I do (really who doesn’t!) and I’m kind of a perfectionist (those who know me will confirm this!). However I’m choosing to step out of my comfort zone and do something that I hope will not only share my love of crafting with others, but also inspire, encourage and support others to start creating as well. 

A little about me- I’m 40 something, A carer for a person with a disability, and I work a couple of days a week as an Early Childhood Teacher. I love to make things, I enjoy cooking and I dabble at gardening- mostly hardy Australian natives and succulents because I tend to kill anything else! I have a four legged companion who is generally referred to as “the supervisor” because his favourite place to lay is under my feet. I like to sing- not because I’m overly good at it, but because it’s something that I find calming- with all the hats that I juggle, there are some days when I sing a lot! If I’m not making something, cooking or singing- I’m snuggled up somewhere reading (usually with a cuppa close by).

My blog name “Made just for you by sis” came about for two reasons. My family all call me Sis, it came from having a first name that was a little tricky for my younger siblings to say! And I stamp everything I make with a “made just for you” stamp. My first stamping efforts were only every name for my family members so they were always signed “made just for you by Sis” and it made sense to just keep on using the name.

I have recently signed up to be a Stampin’ Up! Demonstrator- partly because I can get fabulous discounts but mostly because I’d like to be able to share my interest and love of making things with others. I’ve been with the company for a few months now and while I’ve only ran one party, I’m going with the motto “slowly, slowly catchee monkey” And trusting in Gods timing- not my own.

You can also follow me on Instagram (krisha_thomas) or Facebook (@madejustforyoubysis) or check out my Web Page: https://krishathomas.stampinup.net/  here you can explore the amazing products I will show you and if you’re in Australia, you can place an order or book a class (if you live near me!)

As my photo says “the expert was once the beginner” (Helen Hayes) and today is the first day of my blogging journey. I am sure that I will make mistakes, I’m sure that I will forget to make posts or forget to actually post them- but that’s all part of the learning journey. 

Thankyou for reading my first post. 

Until next time, 

Happy crafting.