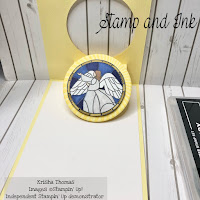
Basic Recipe for Pop and Flip Cards
Create your card base
Cut an A4 piece of Cardstock in half (4 1/4”) and score at 5 7/8”
Cut a 2nd piece of the same colour card stock OR DSP of choice to measure 3 7/4” x 5 5/8”. I used cardstock and ran it through an inked embossing folder to create texture and depth. Adhere to the front of the card, placing glue only around the sides of the card. Use a circle die to cut the circle through both layers of card.
Cut Basic White for inside the card measuring 4” x 5 5/8”. Glue inside of card.
Create the Pop and Flip Mechanism (use the same colour as your base card)
Cut cardstock at 2 1/4” x 4” then score from the longer side at 1”, 2”, and 3”. Fold and burnish each score to create a cube shape. This will get glued at the centrefold of the card with the open edges touching the centrefold of the card.
Cut a second piece of cardstock at 3/4” x 2” then score from the short end at 1” fold and burnish the score line to create an L shape. Glue to the middle of the first mechanism, with the L pointing into the card.
Close card
Cut a 3" scrap of basic white to die cut 2 5/8” circle. Stamp with chosen image and colour.
Adhere the image to the circle cut from the front of the card.
With the card closed, apply adhesive to the smaller piece of card inside the circle, the place the circle back into the negative, ensure adhesive is set before opening.
If you are a more visual learner, Stamp your art out has a video tutorial you can follow along with https://stampyourartout.com/?s=beauty+of+the+earth
I hope you enjoy making this card as much as I have.
Until next time,
Happy crafting.


No comments:
Post a Comment