Thursday, 17 August 2023

Double flap card

Hello,
Today I have a pair of double flap cards to show you, which were created using the Bright and Beautiful suite.

     
The first layer of the card hold the main card greeting. I've made these to add to my card stash so I made one in blues and one in purples. I could easily add a number to the front of the card using the Alphabet a la mode dies when I am ready to send them to someone, or I can leave them as is. This later features the gorgeous Bright and Beautiful 6 x 6 designer series paper. I love the colours in this dsp, it features all of the new and returning colours which a so bright and cheery, just perfect for birthdays.

    
The second layer holds another sentiment and a lovely big bunch of balloons which I have stamped and then die cut using the Beautiful Balloon dies. Again I could add a number or a name inside here if I wanted to at a later date.

   
The final layer of this card features stamped streamers and on the blue one, a left over die cut balloon. This is where I would write my birthday greeting. 


Above is a side shot which highlights the three layers and show a little of how the card is constructed.

You can find the measurements and method of how to make card below

   
Here is another version of the card I made using the Just my Type stamp set and Lemon Lime Twist Card.
 

I would love to know what you think of these cards, please leave a comment below and if you make your own tag me on Social media so I can see what you have made.
Remember, you can find all of the products I've used to make these card on my online store and if you live in Australia and don't already have a Stampin' Up! demonstrator, I would love to be your demonstrator - just send me a message about how I can help you.

Until Next time,
Happy Crafting


Measurements

Card Base ( 1st colour card stock)

    o   Cut A4 sheet in half at 4 ¼ “, Score at 57/8

    o   Cut 2 7/8 off one end – this will become your top layer

    o   Cut mat 4 x 2 ¾

    o   Cut DSP 3 7/8 x 2 5/8  (This will go on the shorter half of the card base)

    o   Cut DSP 3 7/8 x 5 5/8 (This will go inside the card base)

 Top layer 

    o   Cut card mat (2nd Colour Card stock) at 2 ¾ by 4”

         o   Cut DSP at 2 9/16 by 3 ¾

Inner Card

         o   Cut card (1st colour) at 10 3/4, Score at 5 3/8

         o   Cut card mat (2nd colour) 5 1/8 by 3 1/8

    o   Cut Basic White Card 5 1/8 by 3 1/8

Plus additional white card to stamp and die cut balloons.        


Method

1.       Cut and score card stock to measurements given. 

2.       Layer and glue Card and DSP to the front and inner layers of the card base, top layer and inner card

3.       Turn the top layer at 90 degree angle to the card base.

4.       Apply glue to the top half of the top layer and secure to the middle of the front of the card base.

5.       Open card base, apply glue to the back of the inner card and secure in the middle of the card base.

6.       Decorate with stamped and die cut balloons, sentiments and streamers as desired.


Friday, 11 August 2023

Simple treat bags.

Hello,
Today I wanted to share with you some really simple little treat bags that I made as swaps for our team meeting last week. They are so quick and easy as the bag itself is made using one 6 x 6 piece of DSP and scored 6 times. 


I used the Bright and Beautiful 6 x 6 DSP for the bag. I love this DSP set as it full of bright colours an simple designs that just pop. The piece I've used here features Lemon Lime Twist, a colour I think tied in perfectly with the Little Monkey stamp and little Monkey builder punch.

To make the bag, you need to score the DSP at  1 3/8", then turn the DSP 90 degrees and score at 1 3/8 , 2 3/4, 4 1/8 and 5 1/2"- as per the diagram below, the 1 3/8 and 4 1/8 scores only go to the score line while the 2 3/4 and 5 1/2 scores go the whole way up the page.                                                                            


I then folded and burnished the two long scored lines and the bottom score line. Cut away the shaded area and snip all 4 lower squares to create the base flaps.
Apply glue along one side (marked red on diagram) and fold the two edged together to create the box.
Then tuck in the bottom flaps, applying glue to each flap to secure the base. 
That's it - that's the bag made.


To make the bag topper, I cut some Lemon Lime Twist card stock using the 2nd largest of the deckled rectangles dies, which I then folded in half. I put a line of Seal along the fold and folded it over. 
To decorate the topper I used the large leaf stamp from the Little Monkey stamp set and stamped randomly over one side of the topper in Lemon Lime Twist Ink to create a tone on tone effect.

I then used a circle punch to cut a 2" circle from Lemon Lolly card stock and randomly stamp bananas around it in Lemon Lolly ink. Then used crushed curry to stamp the sentiment. You can see that I have only stamped half of the sentiment by only inking the top of the stamp. I glued this to the left side of the topper.

I stamped the monkey image from the Little Monkey stamp set in Pecan Pie ink and used the little Monkey builder punch to cut a monkey from Pecan Pie card stock. I then stamped the head of the monkey in Pecan Pie onto crumb cake card and cut this from the punch as well. I glued the face over the body piece to create a two tone monkey. I then glued the monkey slightly over the circle on the right side of the topper.

To finish the topper, I stamped a Banana in Crushed Curry onto a scrap of Lemon Lolly card and cut using the little monkey builder punch.


I then filled the bag with banana's and slid the topper over the bag to complete it. How sweet is this! 

Once I made one bag, I wanted to try another one. I found these limited edition milkshake lollies which I thought would be perfect to use with the Share a Milk Shake stamp set and Share a milk shake dies. Below are some photos of the treat bag I created with the alternate stamp set. 


Again, how sweet do they look! I think that either of these bags would make a perfect little treat bag for a children's party or for Halloween.


If you would like to make these and live in Australia, you can find all of the stamps, dies, card stock and DSP via my online store krishathomas.stampinup.net 

So that's all for today,
Until next time,
Happy Crafting.


Sunday, 6 August 2023

So Very Merry Pop and Flip Cards


Basic Recipe for Pop and Flip Cards

Create your card base
Cut an A4 piece of Cardstock in half (4 1/4”) and score at 5 7/8”
Cut a 2nd piece of the same colour card stock  OR DSP of choice to measure 3 7/4” x 5 5/8”. I used cardstock and ran it through an inked embossing folder to create texture and depth. Adhere to the front of the card, placing glue only around the sides of the card. Use a circle die to cut the circle through both layers of card. 

Cut Basic White for inside the card measuring 4” x 5 5/8”. Glue inside of card. 

Create the Pop and Flip Mechanism (use the same colour as your base card)
Cut cardstock at 2 1/4” x 4” then score from the longer side at 1”, 2”, and 3”. Fold and burnish each  score to create a cube shape. This will get glued at the centrefold of the card with the open edges touching the centrefold of the card. 
Cut a second piece of cardstock at 3/4” x 2” then score from the short end at 1” fold and burnish the score line to create an L shape. Glue to the middle of the first mechanism, with the L pointing into the card. 
Close card

Cut a 3" scrap of basic white to die cut 2 5/8” circle. Stamp with chosen image and colour. 
Adhere the image to the circle cut from the front of the card. 
With the card closed, apply adhesive to the smaller piece of card inside the circle, the place the circle back into the negative, ensure adhesive is set before opening. 

If you are a more visual learner, Stamp your art out has a video tutorial you can follow along with https://stampyourartout.com/?s=beauty+of+the+earth

I hope you enjoy making this card as much as I have. 

Until next time,

Happy crafting. 

Thursday, 3 August 2023

So Very Merry Wooden Christmas Decorations


Hello,
It's not all that long now until Christmas and the Stampin' Up! August-December Mini Catalouge comes out in a few week. However, if you are like me and want to get a head start on your Christmas cards, gifts and decor, you can find a couple of fabulous Christmas stamp sets via the online exclusives including the "So Very Merry" stamp set which I have used to create these Christmas decorations.


I used wooden biscuits as the base of these decorations (I got mine from Life of Colour). Then I stamped the image on in versamark ink, then sprinkled with either black or silver embossing powder. After heat setting the image, I coloured them in using a variety of Stampin' Blends, however, I used the white pencil from the water colour pencil for the angels wings and Santa's beard and hat.
I had a little trouble getting the silver embossing powder to stick to the wood, I'm not sure if this was because the ink pad I used was a little too dry or if the ink dried before I could apply the embossing powder (I was sitting in front of the heater when I did it), However I have more of the biscuits and will try again to see if I can a smoother result when I am not sitting in front of the heater.


If you live in Australia and don't have a Stampin' Up! demonstration, and you would like to purchase this stamp set or any of the other item's that I have used to create these items (except the wooden biscuits) you can find them on my online store here .


Don't forget that if you received any coupons from last months Bonus Day's promotion, you can spend them this month. Remember these can only be used in August and any unused coupons will be forfeited - so use them today!

I have a couple more project's I've created using this stamp set that I will show you over the next few blogs,

So until next time,

Happy Crafting.


Tuesday, 1 August 2023

So Very Merry Illuminated Cards

Hello,

With Christmas fast approaching, It's time to start making your Christmas cards so you have them on hand when you are ready to post them out. The stamp set I am featuring today is one of the online exclusives only available from my online store here

When I first saw this stamp set, I knew it would be perfect for illuminated cards. The imaged feature a number of stamps featuring a stain glass window effect including two large images in circles.


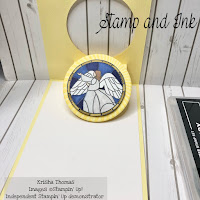
These cards are really simple to make, all you need is a piece of card stock measuring 4 1/8" (10.5 cm) which is half an A4 sheet. The score it along the long edge at 4", 5 1/2", 9 1/2" and 11" (OR 10 cm, 14 cm, 24 cm and 28 cm). Fold and burnish along each of the line and you can see that you have your basic box card. You will be left with a small flap at one end of the card, this is where you will place your tape or glue (or both) to complete the box, however don't do that until you have die cut the window at the font and adhered in your images or else you wont be able to put these in.
As you can see from the images below, you box card will be able to stand up by itself and will fold flat  to fit into a standard envelope.


You can choose the size and shape of the window you cut and fill it with a piece of vellum that covers the inside of the card.
I also like to place a square of basic white card on the back, where I can write my message to the recipient of the card. 
Below I've shared a couple of the cards I made using the different images from the stamp set and using different dies to cut out the window.
PLEASE NOTE - as these cards are made of paper they are highly flammable, therefore ONLY use a battery powered tea light or torch to illuminate these cards.


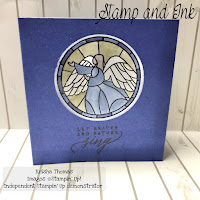
The Angel card, was made using one of the 2023-2023 in colours - Boho Blue. I cut a round window using the retired nesting circles dies. I've stamped the angel image onto a square of velum using black stayz on ink and heat embossed it to create a true stain glass window effect. To add the colour, I coloured the back of the image using Stampin' blends. To get white wings, I used the white ink refill and the water painter tools to brush the ink onto the wings. I stamped the sentiment above. 


The Santa card was made in the same way as the Angel card, although the image was coloured from the front and the window was cut using the 2  3/8 circle punch. As you can see, using the punch instead of the die, makes the window a lot higher and resulting in the sentiment needing to go under the window. Again this image was heat embossed and I again used the white ink to colour Santa's beard and his hat.
 
         
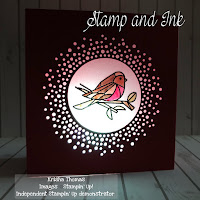
For the bird card, I heat embossed the image and coloured it using the Stampin' Blends to resemble a Robin. The window of this card was created using the large circular die from Labels Aglow Die set. This creates a lovely soft glowing frame when the card is illuminated.


My final card uses the gingerbread house stamp and again uses the Labels Aglow dies to create the window. This one was illuminated using a colour changing tea light which gives it a multi-coloured glow.

If you live in Australia and do not already have a Stampin' Up! Demonstrator and you would like to create these cards yourself, you can find all of the stamps, dies and colouring tools I've used in these cards on my online store here.


Don't forget if you received a coupon in July's Bonus Day's Promotion, they are now available to be redeemed.


Are you looking for a quick and easy way to make a number of cards? Or are you someone who likes the idea of making cards but doesn't want to invest in all the tools in case you don't like it? Or are you someone on a limited budget would like to create cards, but  fear it's out of your budget?
Then this current promotion is for you! Stampin' Up! has a variety of kits that are suitable for every level of crafter and include both stamping and non-stamping kits. All kits have everything you need to make the cards in the kit and for this month only they are up to 30% off. That's a saving of up to $10 per kit! Why not head on over to my online store here and check out the available kits.

I have one more card design to show to featuring the So Very Merry Stamp Set in my next blog,

So until next time,

Happy Crafting

Sunday, 30 July 2023

Frames of Encouragement using the Paper Florist Dies and Courage and Faith stamp set
Continuing with projects created with the Paper Florist dies, today's projects are two frames with a bible verse in the center from the Courage and Faith Stamp Set. 

Here's a quick glance at the two frames together. The frames are cheep frames from K Mart, I think that cost me about $2 each. I've moved the glass to go under a 6 x 4 inch piece of card stock so that I could glue some of the flowers directly onto it. I've stamped the bible verse into the middle of the card, secured it inside of the frame, then placed the flowers around the edge of the frame. When I was happy with the placement, I adhered them to the frame and card with a hot glue gun. I used a hot glue gun because I wanted the flowers to last a while and although the think that Tombow would do the trick, I also want to be able to transport the frames with minimal damage! 

For the first frame I used pinks and purples using Berry Burst, Melon Mambo, Highland Heather, Fresh Freesia, and Basic White card stock for the flowers and Parakeet Party and Green Granny Apple card for the leaves.


While the second frame uses oranges and yellows with Pumpkin Pie, Melon Mambo, Daffodil Delight and Basic White card for the flowers with Garden Green and Green Granny Apple for the foliage.


I love the Courage and Faith stamp set which features a number of bible verses with encourage and uplift which I think are a perfect pairing for the Paper Florist dies.

If you have been inspired to create your own home Decor featuring the Paper Florist Dies, please send me a photo or tag me on your socials - I would live to see your take on them.

I have one more project to share with you using the Paper Florist dies then I might also create some cards with them as well.

If you would like to purchase the Paper Florist dies or any of the other supplies I've used for this project and you live in Australia and you don't already have a Stampin' Up! demonstrator, please head over to my online store https://krishathomas.stampinup.net/

Until next time.

Happy Crafting